
How to integrate a new enterprise product in three simple steps
Most firms today face the challenge of integrating data from different sources, including legacy applications, as a first step towards generating meaningful business intelligence.
If you don’t have the right data integration tool, your database could end up being full of inaccurate data. As a result, it is not useful for analysis. Read this guide to learn how to use Data Finz to transfer data from an old application to a new one. In this scenario, the customer needs to migrate data from PostgreSQL (Postgres) to a new CRM product, UpLyft.
The good news is that products like UpLyft come with an API which can be exposed to create a connection for migrating the relevant data.
Step 1: Configuring the Connections
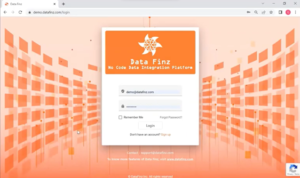
- Login to Data Finz.
2. Navigate to the Configuration page from the home page.
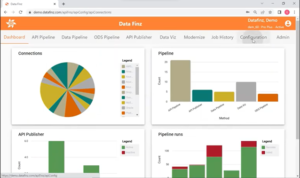
3.The Configuration page lists the connections established, and you can create a new connection by clicking on that option (on the right-hand side of the screen). The connection created for this example is named UpLyft_Accounts.

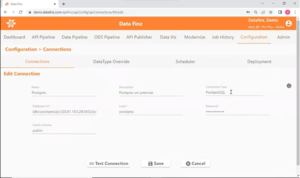
4. Click on the “Edit” button for the UpLyft_Accounts connection to confirm the connector type, callback URL, and host address.. Note that the Representational State Transfer (REST) API makes it easy to extract large data volumes, even if the data is distributed across pages. The OAUTH 2.0 – JWT data connector enables stateless authentication. The mandatory inclusion of a callback URL ensures that bearer authentication tokens are generated automatically.

After confirming the connection specifications, test the connection by clicking on that button.
5. Go back to the Configuration page and select the Postgres connection. Make sure the connection specifications are correct, then test the connection.

This completes the first step of the enterprise product integration process.
Step 2: Modeling, via generating the Design Template
- Developing the model helps understand the structure of the API. This stage creates a JSON Entity Relationship Diagram (ERD) that highlights parent and child entities. ERDs are a feature exclusive to Data Finz and typically not offered by other vendors.
- To create the model, select the API Pipeline option from the top bar in Data Finz and choose the Create New Model option (seen on the right-hand side of the interface). To configure the parameters for the UpLyft_Accounts model, select it from the list and choose the edit option.

3. In the Edit Model Configuration screen, add or edit the model’s name, its description, the method for creating the model, and the data source. Note that the source of the data might be the JSON file, the JSON schema placed into the Model Input box, or the REST API. Models can also be created using Swagger specifications and XML representations.

4. Click on the Generate button to begin parsing the JSON schema and create the ERD. Next, click on the Download button to save the generated ERD, along with the SQL statement and the data template files. The diagram for the sample JSON schema is shown below.
 1
1
Note that this ERP diagram shows data structured in a normalized format, with the top layer and subsidiary layers delineated to reflect the data relationships. Application development or data teams may find it easier to follow the ERD when mapping data from the legacy application instead of the JSON schema or XML structure.
This completes the second step of the enterprise product integration process.
Step 3: Integrating by building the pipeline between the source and the target
- The last step in integrating Data Finz’s REST API with a legacy application is to create a pipeline connecting the two.
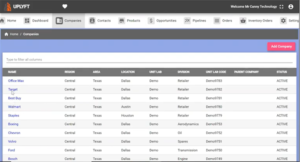
2. To understand the data transfer enabled by building this pipeline, check the data already on UpLyft, as illustrated below for the example in discussion. Adding newer data records should result in a successful data transfer. These records will be shown at the top of the listing.

3. To create a pipeline, click Integrate under API Pipeline and pick Create New Pipeline. Then, use the edit button for the pipeline created (UpLyft_Migrate_Accounts in this example) to configure its parameters.

4. Step 1 of configuring the pipeline requires specifying the source and target connections. Further, since the pipeline is bound to the model created in the previous step, the name of the model (UpLyft_Accounts in this example) is included in the configuration. Note that if the target connection is not the REST API (also called UpLyft_Accounts in this example), a Target File Name is also required.

Rows Features
1. The Target Process Split Rows feature is also unique to Data Finz. It can automatically figure out how many data objects the API can get at once. In the above configuration, the API is set up to receive 1 object each time. Choosing 0 would mean sending all objects at once, which might require multiple calls if there are more than 100 objects.
2. Next, Step 2 then confirms the data object mapping and adds any appropriate filters. Based on the model shown in the ERD, the destination objects are listed with spaces between them to show that they are related as parents and children.
The object names from the source connection (Postgres in this example) are listed in a drop-down menu. It allows mapping the source object to its corresponding API destination object. Note that the application will look for an object with the same name as the destination object by default if no destination object name is specified.
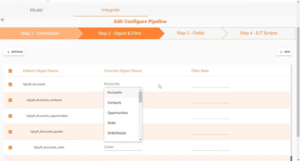
Choose which objects to map, and filter data if necessary. For POST requests, in case the modelled structure is not in line with the legacy data, write semantic views instead of choosing a source object name.
3. Once the data objects are mapped, the next step – Step 3 – requires mapping the data fields for each object. Edit the mapping if the destination field names vary from the source field names as the application looks for the destination field name by default.

4. Choose Mask Option or Transformation to encrypt or convert data while configuring fields.
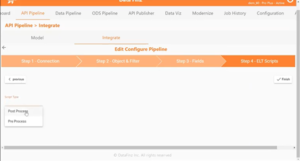
5. Step 4 is optional and meant for developers who want to carry out further pre or post processing of the database using a custom ELT script. The example under discussion does not involve any such processing.
This completes the third step of the enterprise product integration process.
Using the pipeline to migrate data
- After integrating, start the data migration pipeline (UpLyft Migrate Accounts in this example).

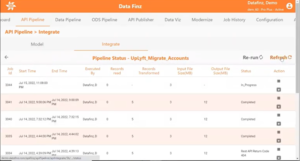
2. Once the run is complete, on the Pipeline Status page, click on the Refresh option. The Pipeline Status summarises each run’s history when refreshed. The pipeline run in discussion resulted in the migration of 5 data records as seen under Records Transformed.
3. Refreshing the data listed on UpLyft should confirm the creation of 5 new records.
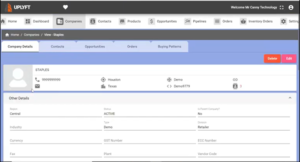
4. Click on any of the newly created records to confirm the accurate migration of data from the source. Select each of the objects to check the data migrated into subsidiary fields.
The data migration process is now complete. Other corporate tools, such as Salesforce or Workday, include APIs that can link to any internal system.