

The Condense Data feature in QuickBooks is among the most recent addition to the QuickBooks Desktop software. This feature lets you delete the audit trail, which reduces the file size while maintaining the accuracy of the detailed transactions. The utility aids in the consolidation of your company data files and is designed to assist you in fixing certain File issues. It is an invaluable feature of the QuickBooks software since it allows users to compress data files. Around the globe, businesses rely on this tool to reduce their data.
What does QuickBooks Condense Data Utility Means?
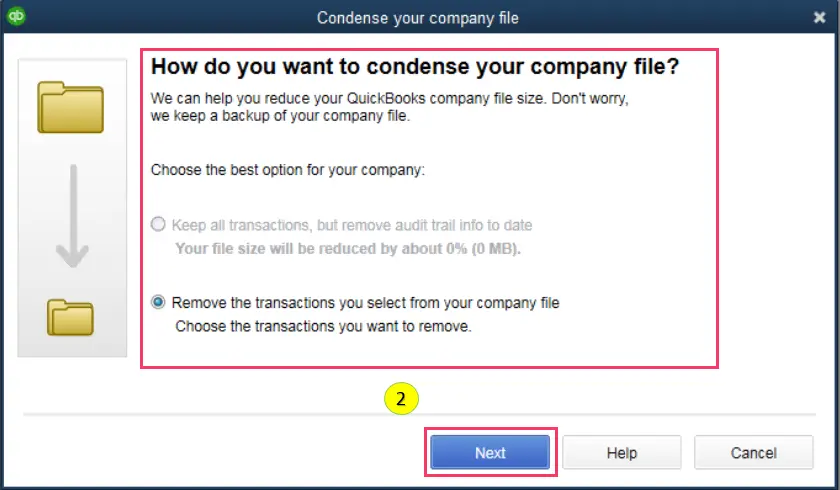
QuickBooks Condense Repair Utility is a tool that is used to fix issues related to the QuickBooks Condense feature. The Condense feature in QuickBooks allows users to compress their company data file by removing old transactions and summarizing the data. However, there have been instances where this feature has caused problems in the company file, resulting in errors or data loss.
The QuickBooks Condense Repair Utility is designed to address these issues by repairing the data file and restoring any lost or damaged data. This tool is only available in QuickBooks Desktop versions 2018 and later.
Advantages of Condense Data Utility
- It assists in the easy deletion of audit trails, thereby reducing the size of the Company File.
- Makes retrieval of the Company file way simpler than before.
- Removes superfluous transactions while preserving the integrity of the important ones.
- Provides a detailed summary of complex transactions.
Using QuickBooks Condense Repair Tool
To use the QuickBooks Condense Repair Utility, follow these steps:
Step 1: Find transactions that aren’t condensable.
In the inception, the first and foremost requirement is that you need to locate all non-condensable files. To use this feature, choose the ‘Run Any Report’ option. Then, make sure that you place a checkmark beside all the transactions that will not be condensed.
Once you are finished with the step, jump to Step 2.
Step 2: Condense the QB file to run the report
- Choose the ‘Utilities’ option from the ‘File’ menu.
- Next, hit on the ‘Condense Data’ option from the ‘Utilities’

- The ‘Wizard tool’ option will appear on your screen.
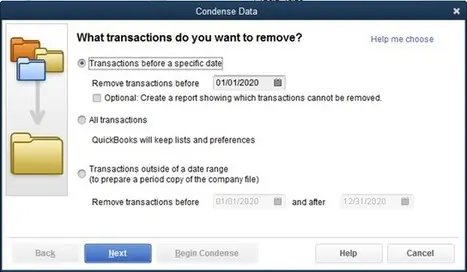
- Then, choose ‘Transaction before specific date’ and enter the correct dates.
- Click on ‘Next.’
- Subsequently, choose the ‘Summarize Inventory Transactions’
- Then, choose the ‘method of condensing inventory’
- You then need to choose the ‘Transactions group’ you want to delete and place a checkmark next to it.
- Next, choose ‘Begin Condense.’
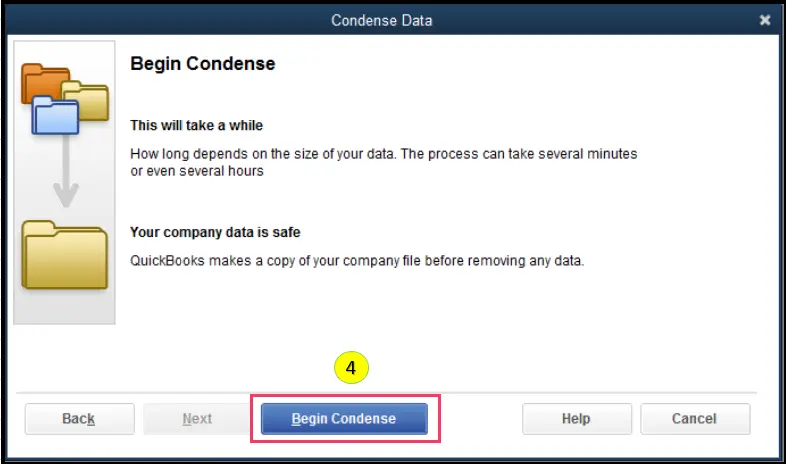
- This will assist you in the QuickBooks Condense process.
Step 3: Prepare the company file
- Opt for the process of ‘Eliminating’ to close the date of all files.
- Choose ‘Accounting’ and opt for the ‘Company Preference’
- Enter the date in the ‘Closing date’
- Afterward, erase ‘Data’ from the ‘closing data’ box section and hit on the ‘OK’ button.
- You can view the profit and loss report or the balance sheet.
- Then, use the ‘Run rebuild and verify the data utility‘ option to ensure that no damage occurs to the data. Afterward, head to the following step.
Step 4: Track the record of the comparison report
Condensing a company file may result in a variety of issues, encompassing data loss, damage to data quality, and several related issues. You are required to create a copy of all essential below-mentioned reports as a PDF before saving the comparison report.
- Cash Flow Statement, Balance sheet, Profit & loss
- Accounts Payable & Receivable
Step 5: Condense the company file
- Launch the Condense Data Utility.
- Then, enter the ‘file’ menu and choose the ‘Utilities’
- Head for the ‘Condense Data’ option and choose the appropriate choices based on your preferences.
- Start with the ‘Condensing’ option once the process is complete.
- Now, head to the ‘File’ menu, followed by choosing ‘Utilities.’
- Select ‘Condensed Data.’

To delete unwanted transactions, choose ‘Transaction outside of a data range.’
- Choose accurate dates for ‘Remove transactions before and after the filter.’
- Go over the provided information to see a comparison of the Pre and Post Condensed files.
Once the company file gets condensed, the user must ensure that the quality performance parameters before and after the condensed data report match together. Follow the procedure below to make that check:
- Opt for’re-run‘ to print the given reports.
- Choose the ‘Profit and loss’ option and then enter dates to keep the balance sheet up to date.
- Then, the accrual-based conclusion reports will show up to reflect the results.
- In any case, if you discover any differences, you must review all alleged transactions that result in differences.
- Choose the ‘Repair damaged transactions’ option and then’re-run compress data’ to restore the backup file.
- You can either create a new company file or use the restored file instead of choosing the’re-run compress data’
That brings us to the conclusion
The above-mentioned information should be enough to give you in-depth knowledge about the QuickBooks Condense Repair Tool. If, however, you are entangled in some web of problems, don’t hesitate to discuss your issues with our QuickBooks error support team to get unmatched assistance.
We are open 24/7 to solve your QB-related issues. All you need to do is to give us a call or reach out to us via the Live Chat option.


