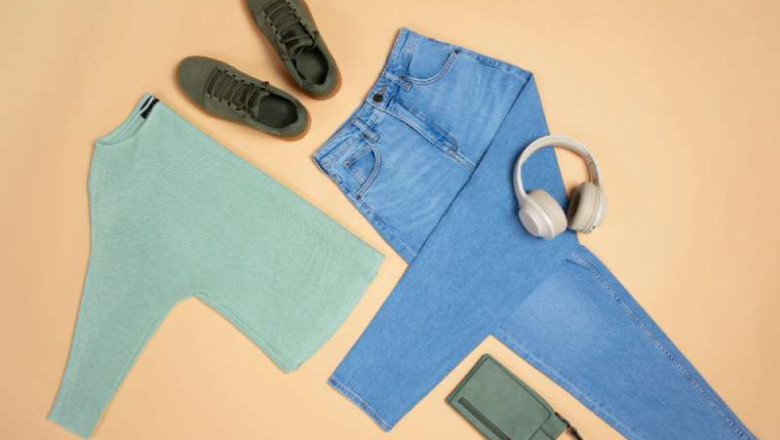
When it comes to product photography, especially clothing photography, the technique called “flat-lay” offers a simple yet artistic vision of your shots. People are drawn to this extremely adaptable photography approach because it is so powerful for communicating narratives.
So, perfecting your flat-lay clothing photography skills is critical to your success as a paparazzo, digital marketer, or any other pursuit you have in mind.
There are lots of ways to get started with flat-lay photography. In fact, you’ll find a ton of great
tutorials and info on the net about this topic. However, it may get confusing or a bit noisy if you're new to this or prefer a straightforward and efficient approach to clothing photography.
So, keeping that in mind, We’ll guide you on how to get it right in an easy way even if you don't have any fancy studio setup.
Let’s get started!
Breaking down flat-lay photography in simple terms
To understand or learn any particular skill set, you must have a clear picture of the subject that you want to master. That’s why this part of the article is very crucial.
According to blogger and photographer Heather Barnes, "Flat lay photographs are captured from a bird's-eye view." In other words, It’s a top-down perspective, showcasing objects arranged on a surface in an attractive and visually pleasing manner.
Also, keep in mind that, there are no angles shown in this type of photography, since the surface and the lens are parallel from a fixed distance apart. Instead, the picture displays a specific aspect taken from a similar position above the surface, which is flat.
For now, that's all you need to know about the term to get your flat-lay clothing photography project off the ground.
Where do you start?
This is the hard part, as it takes time and much thinking on how to make the perfect flat lay clothing photography setup for your project, aiming for the best results that you and your client desire. However, by keeping things basic and simple, this step shouldn’t be that hard to do. Let’s see how to make it happen.
-
The Background
In flat-lay photography, the background is crucial. You can choose to highlight product details without distracting from them. Opt for solid backgrounds, often in white or grey, to achieve this effect. Keeping your background significant with a touch of simplicity is what you should aim for.
For example, InstaSize recommends using backgrounds like tabletops, wooden floors, white cardboard, benchtops, marble tiles, shaggy rugs, or clean bed sheets for achieving versatile and effective results with your creative clothing photography.
-
Clean Camera Setup
This is the part where you’ll bring the most out of your photography equipment. You can use either a DSLR or a smartphone to make this happen.
Placing your camera correctly is also a crucial factor. To do this, you can take the help of a tripod or do it manually by using a ladder with a hand-held camera.
The key consideration here is the height, as it impacts the lighting of your photo. Also, keep in mind that your tripod might not always provide the ideal height for achieving the desired lighting for your photos. We’ll discuss more on lightning setup shortly in this article.
When capturing product photos, opt for an ISO of 200 or lower for optimal clarity. Additionally, make sure to fine-tune your camera's white balance settings to match the specific lighting type you're using, whether it's fluorescent, incandescent, tungsten, or natural.
For DSLRs, stick with a standard camera lens for most flat-lay photography. Avoid using wide-angle lenses, as they can distort the image.
-
Prepare your Apparel
Flat-lay clothing photography doesn't vary significantly from capturing other products. The main distinctions lie in the preparation and lighting phases.
To achieve the best results, consider these essential tips. Present your clothing as true to life as possible. This involves ironing the garment and carefully laying it flat on the surface for photography, ensuring there are no unwanted creases. Hide all labels, price tags, and tidy up any unruly threads. Just before the session, use a lint removal tape roll to keep things clean and professional.
To enhance the quality of your flat-lay fashion photography, consider your presentation with attention-grabbing touches. For example, arrange the clothing naturally, as if it's draped over a body. Introduce some appealing elements, like a charming accessory in the corner or a glimpse of the table's wood texture.
That’s it, you don’t need to make the set any complicated, ensure that the story you are trying to tell with your product can correlate with your creativity.
What should be your Optimum lighting setup for clothing flat-lay photography?
Lighting setups can indeed be a bit tricky, often requiring several tries to get them just right. To help you grasp this concept better, let's delve into some easy options you can experiment with.
When capturing a flat-lay image of clothing, conveying the three-dimensionality of the items can be overwhelming. They tend to appear flat like paper cutouts when laid on the surface.
So, to ensure your clothing stands out from the background, light the items from a lower angle. This technique allows you to cast shadows on the natural wrinkles of the products, introducing depth and highlighting the textures of the garments.
Now, If your workspace lacks adequate natural light, the ideal solution is to establish controlled lighting. When using a single light source, position it to the side of your flat lay setup at a 45° angle. If you have two lights, place them on either side or at opposing corners, facing each other, and tilted at the same 45° angle.
If things don't start to work as you desire, try exploring various lighting options, such as using flash diffusers to soften the flash, reflectors to redirect and diminish shadows, and softboxes to generate additional light sources.
Taking the Perfect Shot! It’s Simple
To capture flat-lay clothing effectively, begin by using a focal length above 35-50mm. It ensures that you avoid distortion in the corners of the photo and maintain the correct proportions of the item.
Next, focus on the camera settings triad: shutter speed, aperture, and ISO speed, as we discussed earlier in this article. When your camera is stable on a tripod or mounted on a flat-lay photography table, it becomes easier to fine-tune these three parameters for optimal results.
When it comes to ISO, the optimal setting falls between 100 and 200. This range minimizes image noise, ensuring your photos maintain their quality. Avoid high ISO values as they can lead to grainy results and degrading image quality.
As for the aperture, it's advisable to select settings in the range of f/11 to f/16. These values offer a deep depth of field, resulting in the sharpest possible images.
Finally, to achieve better shutter speed, consider using a tripod that enables the use of slower shutter speeds, creating the opportunity to capture lovely, soft shadows on the apparel creases.
Edit your Flat-lay Clothing Photos Like a Pro
In addition to capturing photographs, product photo retouching plays a significant role in getting the desired end images. These editing tasks can encompass a range of techniques, from basic ones like product cleanup, resizing, and file format conversion to more advanced methods such as applying the ghost mannequin effect, eliminating wrinkles, and correcting shapes.
So, to retouch and eliminate imperfections from your flat lay cloth photography, follow these general steps during the editing process.
-
Open the image in your editing software, like Photoshop.
-
Duplicate the background layer to preserve the original image.
-
Begin with exposure and color adjustments, like brightness, contrast, and saturation.
-
Use the spot healing tool to eliminate small imperfections.
-
Employ the clone stamp tool for larger imperfections.
-
Apply a high pass filter to enhance image sharpness. (If needed)
-
Remember to save your edits on a separate layer so you can revert if needed.
These are general guidelines and may vary depending on the specific software you're using.
Final Thoughts
The cool thing about flat lay cloth photography is that you can do a lot of experiments and still you may get the perfect result you were looking for. In other words, there is no specific methodology that you must follow to get 100% out of your project. However, If you're just starting out as a photographer, the world of flat lay photography might initially feel a bit overwhelming. But here's the secret: practice what you've learned and turn it into a routine. As you grow more comfortable with clothing photography, you'll realize that it becomes much easier when you have a good grasp of the process.
FAQs
What is the best lens for flat lay photography?
Composition in flat lay photography involves arranging objects on a flat surface in an aesthetically pleasing way, often captured from a top-down perspective.
What is the composition of flat lay photography?
Lay flat size" typically refers to the dimensions of a printed document when it is open or laid flat, as opposed to its folded or closed size.
How can I make my flat-lay clothing photography more distinctive?
Add your own unique sense of style and personality to the compositions. To produce flat lays that accurately represent your artistic vision, experiment with imaginative concepts, themes, and storytelling.