Once you’vecollected all the required tools, you can start your 80% lower pistol build. We have providedsimple instructions for you to follow and this should be a walk in the park
● Secure The 80%
First, ensurethat the 80% lower pistol is wellsecured on the right side jig plate. Ensure that the pins on the plate areresting inside the pivot pin holes on the rear takedown of the lower. Securethe opposite side using the left jig plate and stand it vertically
● Installation of the Plate Holder of the Template
Install thetemplate plate holder by ensuring the rounded edge is resting along with thebuffer tube housing, then bolt the plate holder to the side of the jig usingthe provided hex-head bolts
● Installation of the Pilot Hole Template
Included in thesetup, are the countersunk hex head bolts which you will use to install thepilot hole drilling template. This template is marked with “3/8 dr 2.00. Youwill tighten the jig then lower it for machining
● Installation of the 3/8” Drill Bit
Install the jigpackage on the milling machine or the drill press. Ensure that you drill exactly 2.000” deep.Before drilling, make sure that you align the lower and the jig with thetooling
● Receiver Pilot Holes Drilling
To protect thedrill bits, lubricate the receiver and the template plate guides. Drill 2.000”of depth into the receiver from the top of the template. Ensure it is precise.Once that’s done, remove the pilot hole plate and the 3/8” bit. Then, replacethe plate with a milling template that comes with the package. It should bemarked “3/8 em 1.375 deep from this face.”
● Receiver Milling To 1.375”
Use the short3/8” end mill bit to replace the 3/8” drill bit. Ensure you apply large amountsof oil to the template plate and the end mill bit throughout the process. Toavoid excess chatter, and for a precise cut, use precise and shallow movements.
● Receiver Milling To 2.000” Deep
You can nowremove the first milling template and the short end bit then install the long3/8” end mill bit. Also bolt the second milling template to the jig. Ensure thedepths are set precisely at 2.000” from the template face using calipers and astop collar.
● Cut the Trigger Slot Out
Once the receivercentral portion has been cut to the desired depth, remove the second millingtemplate and the 3/8” end mill bit. Then install the 5/16” end mill bit andbolt the 5/16” template plate to the jig. Create a slot for the trigger bycutting through the floor of the lower.
● Drill Safety Pin, Trigger, and Hammer Holes
Once the jig and receiver have been placedhorizontally, you can now drill the safety pinholes, triggers, and hammer.Through the right side plate, drill through the receiver sides. Complete thesafety lever pinhole with the 3/8” drill bit, then finish the disconnectorpinhole, trigger, and pinhole with the 5/32” drill bit
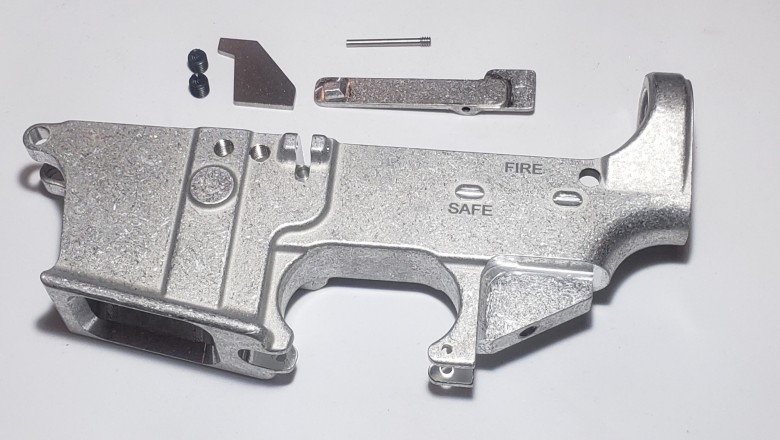
The 80% is now ready forassembly.