One of the most exciting sectors of the IT business is web development. There is a vast library of tools and libraries available, many of which strive to improve an application's functionality and efficiency. However, taking advantage of every fresh opportunity isn't a good idea unless you know what you're doing. Testing and programming with your code is a great approach to improve and optimize an application, but it's pointless unless you're aware of the change. Taking this a step further, we'll explain what Redux is and how you can use it to create amazing React apps.
What is Redux?
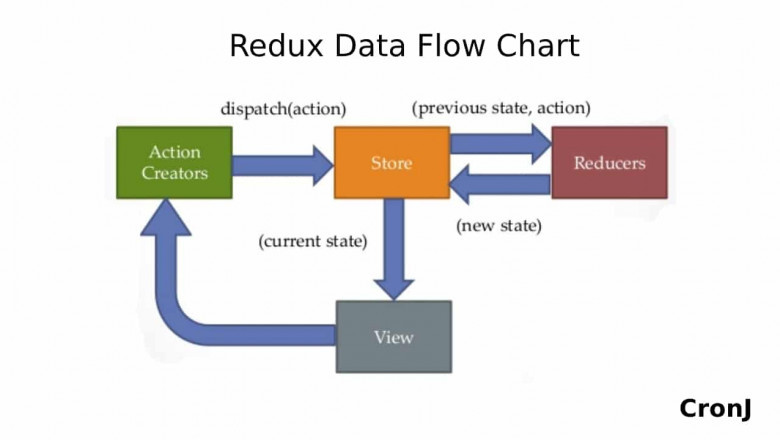
Redux is a library that aids in the management of state in your project. Its concept is based on Flux, but it evolved as a result of the difficulty of creating Flux applications. If you've ever created a Flux application, you'll quickly realize that Redux takes care of all the boilerplate you used to have to write manually. You also have a single state container, unlike Flux. This is a significant benefit because it makes sharing state and reusing code much easier as you develop your application.
Store:-
A store is like a state container. This is where your state resides, as well as where actions are dispatched and managed. When you first start designing a Redux application, you'll need to consider how you want to represent your app and how you want to keep its state. This is significant because only having one store is suggested in Redux, and since state is shared, it's a good idea to consider this before getting started.
Action:-
Actions are objects that specify how we want to change our current state. You can think of actions as your state tree's API.To illustrate, an action for adding a new user could be:
{
type: 'ADD_USER',
data: {
name: 'Foo',
email: 'foo@bar.com',
password: 'Foobar123_'
}
}
The action object should be built with a builder to make things clearer and easy to reuse. In the example above, you'd write a function called addUser(name, email, password) to construct the object. As you can see, deeds by themselves are meaningless. A simple object that defines how we wish to change the state is an action.
Reducers:-
Actions are fun, but they don't make a lot of sense on their own. Reducers are useful in this situation. Reducers are action handlers in your store that act on dispatched actions and convert them to state changes. We might implement a reducer that would pick up an action like ADD USER and add a new user entry to our state if we dispatched it in our store.
Step-by-Step to build a redux with react
1.Build Your React Application
To begin with, we will first use create-react-app to build the application. Type in the following command on your terminal to get started with the application:
create-react-app simple_counter
cd simple_counter
The aforementioned command generates boilerplate code for React. Simply click the next to enter the directory. Follow the steps outlined below if you're working on a visual studio. Code. Now, open your editor and type the following to start the react dev server:
yarn start
Or,
npm start
This will display a screen confirming the start of the application.
2.Library Installation
The next step is to set up all of your libraries and tools. Simply copy and paste the code below into the src file to start your development server.

3.Download the chrome extension
To work with your server, you'll need to install and configure the Redux Chrome extension.
4.Import Libraries
Run the code above by pasting the CSS code below into your source file.

5.Architectural Viewpoint
It has three primary elements that we have discussed above in detail about store, reducer, and action.
6.Defining Actions
We'll use the simple example of addition and subtraction to help you understand how actions are defined and the functionality that goes with them.
// Actions Type
const MULTIPLY_NUMBER = 'mul_number';
const SUBTRACT_NUMBER = 'sub_number';
// Actions
const mulAction = () => ({
type: MULTIPLY_NUMBER,
payload: 1,
});
const subAction = () => ({
type: SUBTRACT_NUMBER,
payload: 2,
});
7.Reducer in React

We've created a mathReducer that accepts two parameters: state and action. A default value of 0 is supplied for the state argument, which is used to initialize the value of the state when the store is created for the first time. The value passed is used to update the current state value in the following scenarios.
8. Redux Store Creation
// Store
const store = createStore(
rootReducer,
window.__REDUX_DEVTOOLS_EXTENSION__ && window.__REDUX_DEVTOOLS_EXTENSION__()
);
There are two parameters in the below-mentioned store. The first parameter is the root reducer, and the second is the code to show the same on Chrome.
9. Props mapping
Here we made use of two different function,one is mapStateToProps and other one is mapDispatchToProps
// mapStateToProps
const mapStateToProps = (state => {
return {
number: state.math.number,
};
});
// mapDispatchToProps
const mapDispatchToProps = dispatch => ({
multiply: () => dispatch(mulAction()),
subtract: () => dispatch(subtractAction()),
});
10.Connect and Render Redux
const Counter = (props) => (
< div >
< h2 >Counter: {props.number}< /h2 >
< input type='button' value='multiply' onClick={props.mul} / >
< input type='button' value='subtract' onClick={props.subtract} / >
< /div >
);
const ConnectedCounter = connect(mapStateToProps, mapDispatchToProps)(Counter);
const App = () => (
< Provider store={store} >
< ConnectedCounter / >
< /Provider >
);
This is the last phase in the process. We've constructed a counter function with three states: props.number, props.sub, and props.mul. Each of the states can be invoked and accessed as needed.
Conclusion
The React application benefits greatly from the use of Redux. It improves the application's maintainability and predictability. Not to mention that it makes the React application's debugging and testing process much easier. If you're still not convinced, get the help from the best react js agency. We have assisted hundreds of clients across the world with the state management solution to increase the performance of their React-Redux application as a worldwide famous react development business.