BizTalk Schema for XML Messages
To create a new schema
In Solution Explorer, select the BizTalk project to which you would like to feature a schema.
On the Project menu, click Add New Item.
In the Add New Item – dialog box,
in the Templates section, click Schema.
In the Name box, A name for the schema, then click Add.
If necessary, click on the F4 to open the Visual Studio Properties window.
In the schema tree view, select the Schema node, then within the Properties window, select the Target Namespace property and sort a reputation for the target namespace. It is important that you simply set this property during this initial phase of schema creation; avoid using the default Target Namespace property value.
Schema from a non-XSD source
In Solution Explorer, right-click a BizTalk Training project, point to feature, then click Add Generated Items.
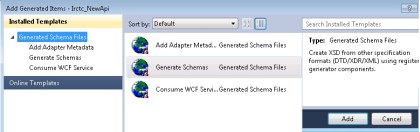
In the Add Generated Items – dialog box, in the Templates section, select and click Generate Schemas, and then click Add. In the Generate Schemas panel, in the Document type drop-down list, select XDR Schema, DTD Schema, or Well-Formed XML.
Get more information On Biztalk Course
If you see either DTD (Not Loaded) or Well-Formed XML (Not Loaded) in the drop-down list, select the appropriate document type anyway, and you will be guided through the process of installing the missing DLL. Then repeat these steps.
In the Generate Schemas dialog box, click Browse, locate the file you would like to import, then open. The file you find must match the document type you chose within the previous step.
A new schema is generated from the required file, using an equivalent name as that file with the .xsd extension, and opened in BizTalk Editor.