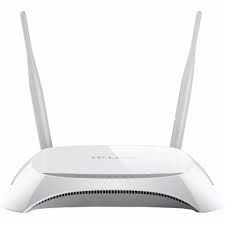
How to set up a Tplink router in a home network?
During the setup process, users can take the help of the Quick setup guide that comes along with your Tp-link router. The Guide contains guidelines and pictographs of the setup process and other prominent troubleshooting methods. If you are connecting to the router for the first time, make sure you know the default Wireless settings of the router. You can fetch default Wireless credentials either from the Wi-fi configuration card or from the back of the router.
Steps to setup a Tp-link router in a home network
-
Power off the modem and remove the battery from its back panel.
-
Connect the router and modem using modem cable with one end to the Internet port of the router and the other end to the modem.
-
Power on the modem by connecting its power adapter to the power source.
-
Turn on the power switch and wait for a few moments to get the router successfully turned on.
-
When the Power LED gets stable, go to your computer and open the Wi-fi settings.
-
Scan for the available Wi-fi networks near your computer.
-
Connect to the default Wi-fi name of the Tp-link router.
-
You can fetch the default Wi-fi details from the back of your router.
-
Type the default Wi-fi password and click on the connect button.
-
Once you are connected, open a browser on the computer.
-
Type either tplinkwifi.net or 192.168.1.1 on the address bar of the browser
-
Hit enter and the tplinkwifi.net configuration page appears.
-
Create an administrator password to manage the tplinkwifi.net interface of the router.
-
When you are done, click on the "Let’s get started" tab.
-
Select the time zone according to the region where you are in.
-
Click on the Next.
-
Select the Internet connection type for the network, click on the Auto Detect function then click on the Next tab.
-
It will take a few seconds to detect the Internet connection suitable for your network. Click on the Next.
-
Personalize the Wireless settings including the network name and the Wifi password of the network.
Note: Follow the guidelines while assigning the network name and Wifi password to both the Wi-fi bands of the router.
-
You can also hide the network by selecting the “hide SSID” option. It will keep the anonymous users away from accessing the network.
-
Click on the Next button to proceed further.
-
The summary page appears on your screen, click on the Save button to save all settings you made.
-
Now, reconnect to the Wi-fi using the assigned network name and Wi-fi password.
-
Click on the Connect button and come back to the tplinkwifi.net window.
-
Click on the Next button and the router starts the reboot process to apply the settings you made.
-
Click on the login later and in the next window, you will get notified of the completion of the setup process.
-
Click on the Finish tab and close the browser.
Note: While configuring the Wireless settings, users recommended assigning different Network Names to each Wi-fi band. It helps you and other users in recognizing which band they are connecting or connected with. The Wi-fi password field is case-sensitive. Ensure that you activate the Caps lock while typing an uppercase letter and deactivate it while typing a lowercase letter.
For more information tplinkwifi.net
Tplinkwifi.net | tplink router - setup - firmware update